
Are you interested in learning how to draw a realistic rose? This article is for you! It will teach you a few tips on how to make an excellent realistic drawing.
Before you begin you should make sure you understand the difference between a brush stroke and a line. Most of the time strokes are mistaken for lines when learning how to draw a realistic rose. Make sure you understand the difference between these two types of strokes and use them accordingly.
The first step in how to draw a realistic rose is to start out with a pencil drawing. This is the foundation that your work will rest on. You need to learn how to make sure your strokes are sharp and lines are well defined. This will make it easier for you as you progress in learning how to draw a realistic rose.
The next step is to create the overall top view of your rose. What you want to do is make your main focal point of the tallest part of the stem. Then you need to make two smaller points on the stem smaller and connect them with vertical strokes using a straight line. You can also use a small circle or other geometric feature to add some depth in your work. The best thing about doing your realistic rose drawing this way is that you can build up the height of your petal over time.
Next, you need to learn how to doodle. Most artists doodle on the paper using a fine and medium tipped pen. You should try to take a similar approach to how to draw roses by using simple pencils and very detailed lines. Drawing with simple pencils does not require a great deal of pencil experience, but if you want to improve your art you will need to pick up a few different doodles.
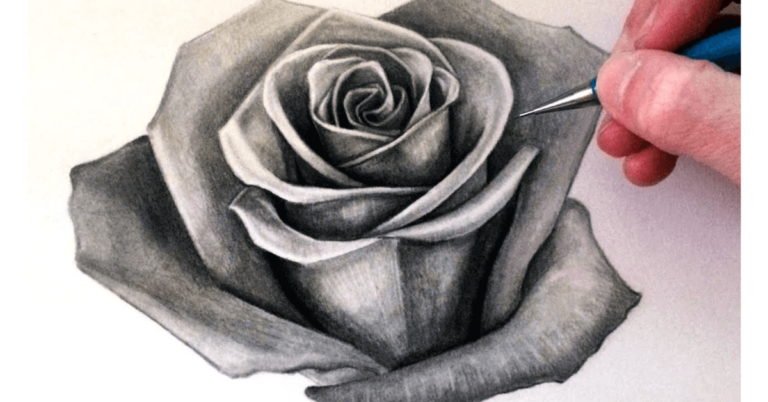
The last step in this rose drawing tutorial is to learn about shading. Shading is what gives your petals volume and shape. It is also the thing that adds a sense of realism to your drawings. While it is easy to get caught up in creating amazing details, shading your picture will help make everything come together more smoothly.
To do the shading, you start off with soft shadows under your eyes and on your cheeks. The next step is to add more intense shading to your neck. After that, add even more light to your lips. The final step is to add some darker shading to the tips of your petals and around the outside of your rose’s head. These are the areas where you’ll use a combination of hard and soft strokes to bring out the realism. By the time you’re finished with the tutorial, you should have a better idea of how to draw a rose step by step.
Remember, the key to drawing any kind of detailed figure is to keep it as flat as possible. You can add shading to your petals later on, but for the most part you should keep everything very close to the original shape. Another great tip that you’ll find in this tutorial series is to only draw the outline of each petal. By doing this, you will know exactly what parts of your picture need to be colored and which ones don’t. You can experiment with different color combinations, once you know exactly what each section of your drawing needs to look like.
You can start by creating the basic shapes for your rose. You should use a hard pencil to make these shapes, then once you have them you can use a softer pencil to darken them up. You can use a combination of colors to create more of a blended look as well. Start by creating a simple pencil sketch so that you can see how your petals will look when you begin drawing them. You can always add more detail to your drawings once you have drawn the basic outline.
Next, you’ll need to learn how to draw the basic parts of your petal. Keep in mind that you want to create the largest amount of light and shadow as possible. This will create the effect of depth in your drawings. If you have a soft brush, you can begin by brushing in very light strokes. When you start adding in more detail to your petals, use a harder brush to create a shaded effect.
When you have finished learning how to draw petals, it’s time to move on to learning how to draw the actual leaves. The easiest way to draw the leaves is to simply create texture with your pencil. Use a pencil drawing to create an oval shape, then with your pencil, add in just a little bit of water so that you can create the surface of the leaves. Remember that you want to create texture with your pencil so that you can learn how to draw different leaf patterns.
[…] Also Read: How To Draw Realistic Rose Petals […]
[…] Also Read: How to Draw a Jungle Tree […]
[…] Also Read: How To Draw Realistic Rose Petals […]